Search This Blog

Friday, 14 December 2012

Internet Explorer Troubleshooting

Internet explorer is the most widely used web browser by Microsoft. Just like other browsers it faces many problems, it crashes, stops working, or closes immediately after being opened, sometimes also gives an error message about Internet Explorer not working or that it encountered a problem and needs to close.

The foremost step towards internet explorer troubleshooting is that to make sure that you have a good connection to the Internet. If Internet Explorer doesn't opens or it opens briefly and then closes, the problem might be caused by low memory, or corrupted or missing system files. You can try to restart the computer to clear the memory and then open Internet Explorer by itself. But if Internet Explorer is still having problems, try the following:

While browser add-ons can enhance your online experience, they can occasionally interfere or conflict with other software on your computer. Sometimes it’s the add-ons you use which cause the problem. You need to detect which add-ons are causing the problem. Here’s how you do it:

  • Click the Start button
  • Click All Programs
  • Click Accessories
  • Click System Tools
  • Then click Internet Explorer (No Add-ons).
If disabling all add-ons solves the problem, you need to disable all add-ons and then turn on add-ons only as you need them. This will allow you to figure out which add-on is causing the problem.

To manually enable or disable add-ons, you need to follow following steps:
  • Open Internet Explorer by clicking the Start button, and then clicking Internet Explorer.
  • Click the Tools button, and then click Manage Add-ons.
  • In this window you can enable / disable individual add-ons.
If above add-on disabling method doesn't solve the problem, try resetting Internet Explorer back to its default settings. This method will remove all changes that have been made to Internet Explorer since it was installed, but it does not affect your favorites or feeds. Here is the procedure:
  • Close all Internet Explorer or Windows Explorer windows.
  • Open Internet Explorer by clicking the Start button, and then clicking Internet Explorer.
  • Click the Tools button, and then click Internet Options.
  • Click the Advanced tab, and then click Reset.
  • Click Reset.
  • When you are done, click Close, and then click OK.
  • Close Internet Explorer and reopen it for the changes to take effect.
If windows update or malware scan doesn't helps, then you might require an additional help.  At this point, you can look for a local technician or online tech support providers.

Friday, 7 December 2012

Setting up various email accounts for iPhone

In this fast paced modern world, users want to manage their life on the go. Whether it’s sharing pictures, sending emails or creating conference; smart phones are taking the world by the storm. When we talk about smart phones we can think of only one name: Apples’ iPhone.

Setting up an email account in iPhone (5, 4, 3G etc.) is pretty easy and takes only a few taps to have an email account synced with your phone in no time.

Things you need to know

Here are a few things you need to know before you begin to setup your email account

  • What email service would you like to sync with your phone.
  • Your email user-name and password.
  • If your email account isn't through MobileMe, Gmail, Yahoo, or AOL, you'll also need to know your incoming mail server (IMAP or POP) and outgoing mail server (SMTP).
Once you have all of that information, follow these steps to add an account:

Setting up an email account (Gmail, Yahoo or Hotmail)
  • Open the “Settings” option on your iPhone.

iphone settings

  • Next, Tap the "Mail, Contacts, Calendars" option on the screen.

iphone mail

  • Now, Tap the "Add Account..." option.

iphone add mail account

  • Choose the type of account you want to add.

mail for iphone

  • Fill in the information required and tap on “Next”

mail account for iphone

  • iPhone will verify the information you entered. This might take a few minutes.
  • Congratulations! Your email account has been setup successfully.

Setting up an email account (Other)

From the list of email options on the “Add Account” screen, if you choose “other” then you will need to know your incoming mail server (IMAP or POP) and outgoing mail server (SMTP).
  • Tap other from email account list


  • Tap on “Add account” option

add mail account

  • Follow the onscreen instructions and fill in the required information for your account and tap on “Next”


  • Now you need to configure your incoming email server (POP or IMAP) and outing mail server (SMTP).
  • Choose either IMAP or POP server and Fill in incoming and outgoing server settings, and Tap on “Next”

  • iPhone will now verify your information and settings. This might take a few minutes.


You have successfully configured your email account with iPhone.

Friday, 30 November 2012

Steps To Setup A Wireless Printer In Windows 7

Wireless printers are a great way to printer on or more documents from various computers connected in a network.  The best thing about wireless printers is that they can be installed without cables anywhere in the area within the network range.

The following steps will help you setup a wireless printer on a network:

Before you Begin
  • Download all the necessary printer drivers from the website onto your computer.
  • Write down your network’s SSID (Network name) and its WEP/WPA security key or pass phrase.
  • Without the network SSID/ pass phrase , you won’t be able to install your product.
  • Ensure that your computer is connected to the wireless router.
  • Make sure your printer is connected to your printer.
  • Turn on your computer.
  • Turn on your Wireless Router.
  • Turn on your printer.
  • Set the firewall to a lower level so that the wireless router and printer can communicate.

Setup your wireless printer

1. Access the "Setup" menu from the touch screen on your wireless printer and Select the "Wireless Setup Wizard" option.


2. Enter the name of your wireless network (Network SSID) and the security password (security key/pass phrase) for the wireless network.


3. Install the software  provided with the printer in the computer after the printer has connected to your desired  network.

4. Click on Start -> Devices and Printers


5. Click on “Add a Printer”


6. Click on “Add a Network, Wireless or Bluetooth printer


7. Computer will search for available printers


8. Click the name of the printer you want to add and click next.


9. Click on “Print a test page” to ensure that your printer is working.


10. After the printer has been added, a dialog of “Printer Successfully Installed” will be shown. Click on Finish to complete printer installation process.

Tuesday, 27 November 2012

Install or upgrade to Windows 8


Microsoft’s latest Windows OS version, Windows 8, has been finally released. With Windows 8, Microsoft intends to open a new dimension to advanced technology with its modern metro touch screen interface.

Whether you are upgrading from windows 7 to windows 8 or just bought a new PC or Laptop, installing windows 8 is a breeze. The following step by step guide will help you in installing the all new Windows 8 onto your system

Upgrade Windows 7 to Windows 8

Microsoft gives the Users an opportunity to upgrade to Windows 8 from their existing Windows 7 operating system while retaining their existing Windows settings, personal files and applications.


1. Preparation

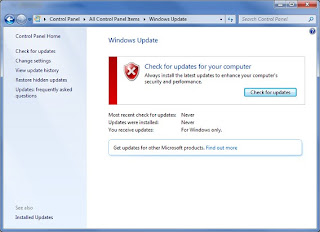
    • Run Windows update to install the perquisite updates and setting for Windows 8 installation (This step will require an internet connection).
    • Press Start Button → All Programs_Search “Windows Update” and open
windows update


    • Click “Check for updates” to download the necessary updates.
update windows


    • Windows will check for required updates and inform you.
check windows for update


    • Install updates for your system. Some of the updates will require you to restart the computer.
updates for windows


2. Installing Windows 8

    • Insert the Windows 8 Installation Disc.
    • Wait for the AutoPlay windows to pop up.
    • Click “Run setup.exe” to continue.
install win 8

    • Windows 8 Installation will be prepared.
win 8 preparation


    • Click on Install now to begin the installation process.
windows 8 installation

    • Setup your preferred language
windows 8 language setting

    • Type in your Windows 8 product Key mentioned on the disc.
win 8 product key

    • Check the “I accept the license terms” to continue.
licence for win 8

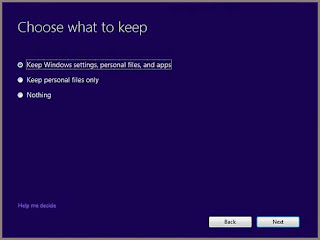
    • Choose whether you would like to keep your original windows files and settings or not and click “Next”.
windows 8 programs

    • Windows will check if your system is ready to upgrade.
install windows 8

    • The Windows 8 upgrade assistant will help in checking system compatibility of the OS
windows 8 apps

    • If there are some programs that might not be compatible with Windows 8, the setup will notify you.
win 8 compatibility

    • When the setup confirms that you are ready to install, Click on Install
win 8 installation process

    • Windows 8 will now be installed
installing windows 8


3. Completing the Windows 8 Installation

    • Please wait while Windows 8 loads on your system
win 8 preparation

    • Setup will take you to profile screen, where you can sign into your account using Windows live ID or local username/password.
win 8 sign in

    • Enter your desired username and password
win 8 account

    • Windows will create your account
win 8 account creation

    • Login using the username and password you created at the profile screen
sign in into win 8

    • The setup will take you to the desktop personalization screen, where you can edit the name for your system and choose its color.
windows 8 personalization

    • Once the Windows 8 desktop shows, your upgrade is complete.
win 8 desktop

Welcome to Windows 8!