Search This Blog

Friday, 7 December 2012

Setting up various email accounts for iPhone

In this fast paced modern world, users want to manage their life on the go. Whether it’s sharing pictures, sending emails or creating conference; smart phones are taking the world by the storm. When we talk about smart phones we can think of only one name: Apples’ iPhone.

Setting up an email account in iPhone (5, 4, 3G etc.) is pretty easy and takes only a few taps to have an email account synced with your phone in no time.

Things you need to know

Here are a few things you need to know before you begin to setup your email account

  • What email service would you like to sync with your phone.
  • Your email user-name and password.
  • If your email account isn't through MobileMe, Gmail, Yahoo, or AOL, you'll also need to know your incoming mail server (IMAP or POP) and outgoing mail server (SMTP).
Once you have all of that information, follow these steps to add an account:

Setting up an email account (Gmail, Yahoo or Hotmail)
  • Open the “Settings” option on your iPhone.

iphone settings

  • Next, Tap the "Mail, Contacts, Calendars" option on the screen.

iphone mail

  • Now, Tap the "Add Account..." option.

iphone add mail account

  • Choose the type of account you want to add.

mail for iphone

  • Fill in the information required and tap on “Next”

mail account for iphone

  • iPhone will verify the information you entered. This might take a few minutes.
  • Congratulations! Your email account has been setup successfully.

Setting up an email account (Other)

From the list of email options on the “Add Account” screen, if you choose “other” then you will need to know your incoming mail server (IMAP or POP) and outgoing mail server (SMTP).
  • Tap other from email account list


  • Tap on “Add account” option

add mail account

  • Follow the onscreen instructions and fill in the required information for your account and tap on “Next”


  • Now you need to configure your incoming email server (POP or IMAP) and outing mail server (SMTP).
  • Choose either IMAP or POP server and Fill in incoming and outgoing server settings, and Tap on “Next”

  • iPhone will now verify your information and settings. This might take a few minutes.


You have successfully configured your email account with iPhone.

Friday, 30 November 2012

Steps To Setup A Wireless Printer In Windows 7

Wireless printers are a great way to printer on or more documents from various computers connected in a network.  The best thing about wireless printers is that they can be installed without cables anywhere in the area within the network range.

The following steps will help you setup a wireless printer on a network:

Before you Begin
  • Download all the necessary printer drivers from the website onto your computer.
  • Write down your network’s SSID (Network name) and its WEP/WPA security key or pass phrase.
  • Without the network SSID/ pass phrase , you won’t be able to install your product.
  • Ensure that your computer is connected to the wireless router.
  • Make sure your printer is connected to your printer.
  • Turn on your computer.
  • Turn on your Wireless Router.
  • Turn on your printer.
  • Set the firewall to a lower level so that the wireless router and printer can communicate.

Setup your wireless printer

1. Access the "Setup" menu from the touch screen on your wireless printer and Select the "Wireless Setup Wizard" option.


2. Enter the name of your wireless network (Network SSID) and the security password (security key/pass phrase) for the wireless network.


3. Install the software  provided with the printer in the computer after the printer has connected to your desired  network.

4. Click on Start -> Devices and Printers


5. Click on “Add a Printer”


6. Click on “Add a Network, Wireless or Bluetooth printer


7. Computer will search for available printers


8. Click the name of the printer you want to add and click next.


9. Click on “Print a test page” to ensure that your printer is working.


10. After the printer has been added, a dialog of “Printer Successfully Installed” will be shown. Click on Finish to complete printer installation process.

Tuesday, 27 November 2012

Install or upgrade to Windows 8


Microsoft’s latest Windows OS version, Windows 8, has been finally released. With Windows 8, Microsoft intends to open a new dimension to advanced technology with its modern metro touch screen interface.

Whether you are upgrading from windows 7 to windows 8 or just bought a new PC or Laptop, installing windows 8 is a breeze. The following step by step guide will help you in installing the all new Windows 8 onto your system

Upgrade Windows 7 to Windows 8

Microsoft gives the Users an opportunity to upgrade to Windows 8 from their existing Windows 7 operating system while retaining their existing Windows settings, personal files and applications.


1. Preparation

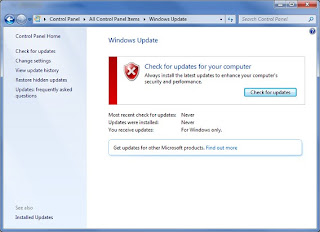
    • Run Windows update to install the perquisite updates and setting for Windows 8 installation (This step will require an internet connection).
    • Press Start Button → All Programs_Search “Windows Update” and open
windows update


    • Click “Check for updates” to download the necessary updates.
update windows


    • Windows will check for required updates and inform you.
check windows for update


    • Install updates for your system. Some of the updates will require you to restart the computer.
updates for windows


2. Installing Windows 8

    • Insert the Windows 8 Installation Disc.
    • Wait for the AutoPlay windows to pop up.
    • Click “Run setup.exe” to continue.
install win 8

    • Windows 8 Installation will be prepared.
win 8 preparation


    • Click on Install now to begin the installation process.
windows 8 installation

    • Setup your preferred language
windows 8 language setting

    • Type in your Windows 8 product Key mentioned on the disc.
win 8 product key

    • Check the “I accept the license terms” to continue.
licence for win 8

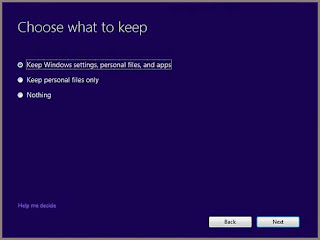
    • Choose whether you would like to keep your original windows files and settings or not and click “Next”.
windows 8 programs

    • Windows will check if your system is ready to upgrade.
install windows 8

    • The Windows 8 upgrade assistant will help in checking system compatibility of the OS
windows 8 apps

    • If there are some programs that might not be compatible with Windows 8, the setup will notify you.
win 8 compatibility

    • When the setup confirms that you are ready to install, Click on Install
win 8 installation process

    • Windows 8 will now be installed
installing windows 8


3. Completing the Windows 8 Installation

    • Please wait while Windows 8 loads on your system
win 8 preparation

    • Setup will take you to profile screen, where you can sign into your account using Windows live ID or local username/password.
win 8 sign in

    • Enter your desired username and password
win 8 account

    • Windows will create your account
win 8 account creation

    • Login using the username and password you created at the profile screen
sign in into win 8

    • The setup will take you to the desktop personalization screen, where you can edit the name for your system and choose its color.
windows 8 personalization

    • Once the Windows 8 desktop shows, your upgrade is complete.
win 8 desktop

Welcome to Windows 8!

Monday, 5 November 2012

A New Version Of Microsoft Windows: Windows 8

Windows 8, the long awaited version of Windows operating system series was finally released on 30th October 2012. With Windows 8, Microsoft intends to open a new dimension to advanced technology with its modern metro touch screen user interface.

After the catastrophic failure of Windows Vista, Windows 7 became the savior for Microsoft and the main motivation behind its consistent improvements and innovations. The improvements in its latest version of Internet Explorer were a proof to the world that the Microsoft was not going to hang up its hat just yet.

Now the main question that comes into the mind of windows users: will Windows 8 be able to replace Windows 7 become the next success story in Microsoft history? Let’s find out.

Here are some of the key differences between Windows 7 and Windows 8 that might help you decide if you need to upgrade your operating system.


Windows 7 v/s Windows 8


windows 7 v/s windows 8


  • Interface


win 7 interface v/s win 8 interface


Windows 7 employs the traditional desktop interface which include start button, start menu, icons, windows explorer and control panel. These features have either been removed or replaced in Windows 8.

The most notable feature of windows 8 is its innovative Metro touch screen interface. This interface has been mainly designed for tablets but will also be available for PCs and laptops. Its design and functionality is similar to Windows Phone OS found in Nokia Lumia devices.

  • Start Button


win 7 start button v/s win 8 start button


In Windows 7, we can easily recognize the iconic start button that has been deployed in every version of Windows. When we click on it we can see the start menu along with shortcuts to various computer services pinned in it.

In Windows 8, Start button is hidden. It now only appears when you hover in the bottom left corner with your mouse.

  • Start Menu

start menu win 7 v/s start menu win 8


In Windows 7, the familiar start menu, popped up when we clicked the start button, which has now been replaced with a Start Screen.

In Windows 8, the start screen uses dynamic app tiles instead of static computer icons which the user must touch to perform its function. The same kind of live tiles and data have been used in Windows Phone's home screen.

  • Theme

win 7 theme v/s win 8 theme


The Aero Glass theme of Windows Vista and Windows 7 has been replaced with a Metro-style theme in Windows 8.

  • Windows Desktop Gadgets

win 7 gadgets v/s win 8 gadgets


Popular desktop gadgets which were used in Windows 7 such as Calendar, Clock, Shutdown, CPU meter, Feed Headlines, Notes etc. will be no longer available.

Most of these gadgets will appear on Windows 8 Start Screen.

  • Update Notifications

win 7 update v/s windows 8 update


In Windows 7, we got our update notifications via system stray icon and balloon messages.

In Windows 8, all system and update messages will be shown on login and lock screens, so you might not even see them if you automatically log into your PC.

  • Backup & Restore

restore win 7 v/s restore win 8


In Windows 7, the Backup and Restore feature that allowed users to create system and files backups and restore from them.

In Windows 8, this feature has been replaced by a new feature called File History.

  • Searching Files & Folders

win 7 search v/s win 8 search


In Windows 7, searching for files and folders was done through the search bar embedded in the start menu and windows explorer. The search bar allows users to find anything, anywhere on the computer by revealing its original file location.  There is an easy shortcut to Control Panel, where you can view and modify computer settings. The start menu has shortcuts to access various document, music and videos folder in one click. It simply takes one click to shutdown the computer, lock or hibernate system, or switch to another user.

In Windows 8, the only way to locate files and folders on the system is the charms bar that remains transparent on the home screen and lets you access to all the key features. These appear when you mouse to the right side of the screen or swipe in from the right on a touch screen. The Settings charm gives you quick access to basics such as volume and brightness controls, as well as putting your PC to sleep or restarting it.

  • New Dialog Box For Copying

win 7 v/s win 8

The new version of Windows Explorer in Windows 8 brings all of your file copy/ file move jobs into a single window, instead of managing multiple windows. You can also pause or stop copy jobs, easily manage file-name collisions  and get more details about the copy job, such as the speed of data transfer, more accurate estimate of time remaining etc.

  • Personalization

Microsoft win 7 v/s Microsoft win 8


In Windows 8, you can extend your home screen personalization. You can re-organize tiles, add tiles, group tiles, or remove tiles that you don’t need. You can configure the tiles to be live or not.

Conclusion

Wrapping up this post we would like to state that whether or not a user should upgrade to Windows 8 depends entirely upon their choice. Windows 7 is still powerful and popular. If the user feels that they aren’t impressed with Windows 8 they can continue using Windows 7.

Windows 8 is beautiful, it’s fast, and most importantly, it’s easy to use. It offers something for everyone from simple users who just want to check their email, surf the Web, and watch videos, to advanced users who need to manage multiple external hard drives.

Windows 8 will confuse you the first time you use it, but give it some time and chances are that you might not want to go back to Windows 7.